Digital Menu Control Panel: Desktop and Mobile Dashboard
4 minutes
The iaMenu dashboard is your operations center for managing your entire digital menu. In 4 minutes, you will learn how to navigate between the two interfaces (desktop and mobile), use advanced filters to find any product instantly, and reorganize your menu with drag & drop.
What You Will Learn in This Section
- The two interfaces of the dashboard: flat accordion (desktop) and hierarchical navigation (mobile)
- How to use filters by type, allergens, price, and languages
- How to change the active menu language from the selector
- How to reorganize categories and products with drag & drop
- Shortcuts to Gaston, QR, PDF, and settings
Step 1: Overview of the Dashboard
The iaMenu control panel has two completely different implementations, each optimized for its device. It is not a responsive design: they are two experiences designed from scratch.
On desktop, you have a flat accordion that displays your entire menu in a flat list with visual indentation by levels:
- Level 0 — Categories (Pizzas, Beverages, Desserts)
- Level 1 — Subcategories (Classics, Specials) and Products in Category
- Level 2 — Products within subcategories (Margherita, Carbonara)
Everything is visible at a glance. You can expand and collapse each category to focus on what you need. On the left, you have the sidebar with access to QR, PDF, Customer View, Settings, and more.
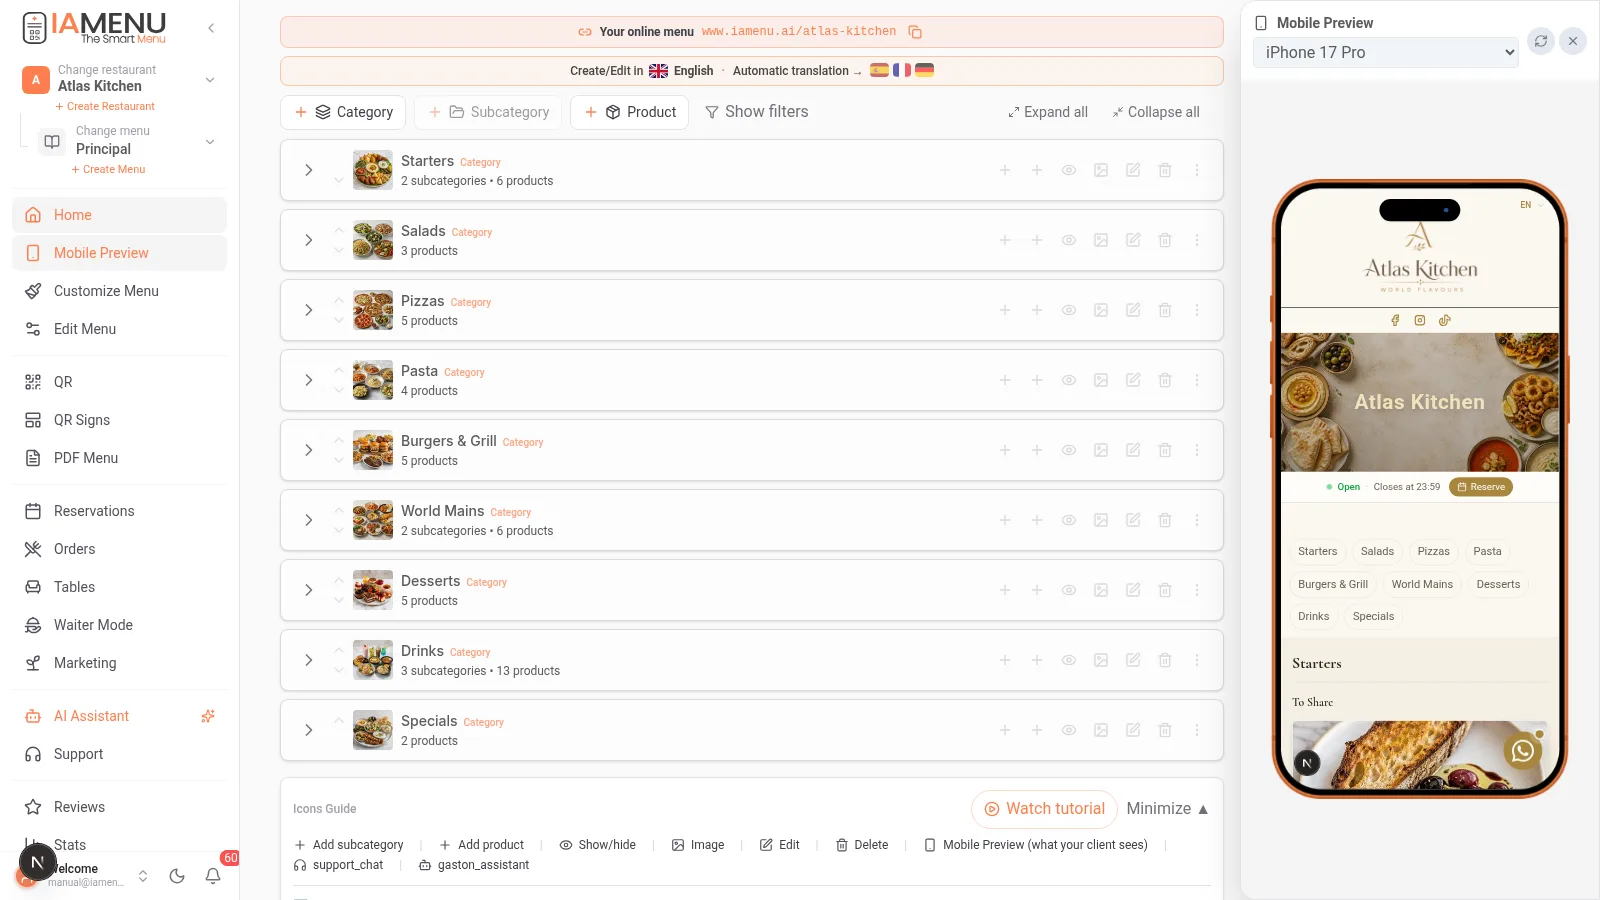
On mobile, the experience is completely different: a hierarchical navigation by levels where you progress step by step.
- View 1 — List of categories (tap one to enter)
- View 2 — Subcategories + Products in Category
- View 3 — Products within the selected subcategory
At the top, you have breadcrumbs to go back. The hamburger menu (three lines at the top left) opens the sidebar with all the tools.
Tip
Tip: The dashboard always shows the active menu. If your restaurant has multiple menus (breakfast, lunch, dinner), select the one you want to manage from the menu selector at the top.
Step 2: Main Navigation and Tools
From the dashboard, you access all the centralized management tools for your digital menu: QR generator, PDF exporter, customer view customizer, restaurant settings, and Gaston, your AI assistant.
🖥️ On desktop: The left sidebar contains all the shortcuts. At the top, you will find the active language selector, your restaurant's name, and access to the manual.
📱 On mobile: Tap the three lines (hamburger) icon at the top left to expand the sidebar menu. You will find the same sections, adapted for the touchscreen. Gaston is always visible as a floating button in the bottom right corner.
| Section | What You Will Find |
|---|---|
| Home | The accordion with your active menu |
| Mobile View | Live preview of your menu as seen by the customer |
| Customize Menu | Info, WhatsApp, hours, social media, branding, and styles |
| QR / QR Posters | Your QR and the poster editor (menu, tables, and reviews) |
| PDF Menu | Export with 10 templates and 8 paper formats |
| Reservations | Online and manual reservations (guide) |
| Orders / Tables / Waiter Mode | QR orders at the table and kitchen kanban (guide) |
| Marketing | CRM, loyalty, promos, and campaigns (guide) |
| Reviews | Google reviews and private suggestions (guide) |
| Statistics | Visits, top products, and AI suggestions |
| Menu Languages | Choose from 29 supported languages; activate 2, 4, or 8 according to plan |
| AI Assistant | Gaston, your assistant (guide) |
Pro Tip
Pro Tip: If you manage multiple locations within your plan's restaurant limit, each restaurant has its own independent dashboard. You can switch between them without logging out, while role-based permissions control what each user can do.
Step 3: Advanced Dashboard Filters
Filters allow you to find any product in seconds, even with hundreds of items. The filter system works entirely in the browser (no server calls), so the response is instant.
🖥️ On desktop: The filter bar is above the product list. You can combine multiple filters at once.
📱 On mobile: The filters open as a sliding panel from the bottom (drawer). Tap the filter icon to open it and select the options you need. When you tap "Apply," the view updates instantly.
Available Filters:
- By type — All, Categories, Subcategories, Products, Singles
- By allergens — Exclude products with gluten, lactose, egg, etc. (the 14 EU allergens)
- By price — Minimum-maximum range with visual slider
- By languages — View products without translation in a specific language
- By status — Active, Inactive, With image, Without image
- By tags — Vegan, Gluten-free, Spicy, Chef's recommendation
Ahorra Tiempo
Save Time: The filter "Without translation in [language]" is especially useful after activating a new language. It shows you exactly which products need translation, so you can review the automatic backfill or correct manually.
Step 4: Active Language Selector
The language selector changes the visible content of the menu without modifying anything. It lets you inspect the languages active for that restaurant; IAMenu supports 29 languages across the platform, with 2, 4, or 8 active according to plan.
The language selector is at the top of the dashboard (on mobile, it works the same by tapping the corresponding flag). When you change the language:
- The product names display the translation in that language
- The descriptions update to the selected language
- The bottom bar shows "Working on the menu in [language flag]"
- If you edit in a secondary language, the system asks if you want to translate to all others or save only in that language
The interface language (buttons, menus) is independent of the content language. If you create a product in a different language than the base, iaMenu automatically detects the language and translates the rest using the Smart Swap system.
Tip
Tip: You can create content in a supported working language and let Smart Swap prepare other active-language versions. Review translations before publishing, especially dish names, ingredients, and allergens. See Translations.
Step 5: Drag & Drop to Reorganize Your Menu
The order you see in the dashboard is exactly the order your customers will see when scanning the QR. Placing the star dishes at the top can directly increase sales.
🖥️ On desktop: You can drag and drop any item to change its position by holding down the item, dragging it, and dropping it where you want (the change is saved automatically).
📱 On mobile: There is no drag and drop (it's cumbersome on a touchscreen). Each item has up/down arrows. Tap the up arrow to move it up one position or down to lower it.
You can reorganize:
- Categories among themselves (change the order of menu sections)
- Subcategories within each category
- Products within each subcategory or category
The reordering updates optimistically: you see the change instantly while the server confirms in the background.
Importante
Important: Order changes are reflected immediately in the public menu. If a customer is viewing your menu while you are reorganizing, they will see the new order the next time they refresh the page.
Tips and Best Practices
Follow these recommendations to make the most of your dashboard:
- Use filters to review translations. After activating a new language, filter by "Without translation in [language]" to verify that everything was translated correctly.
- Place star dishes in the top positions. Customers pay more attention to the first items on the menu. Use drag & drop to move your best dishes up.
- Use Gaston for repetitive tasks. Instead of editing product by product, dictate to Gaston: "Increase all prices in the Main category by 5%." It's faster.
- Review your menu on mobile before publishing it. QR menus are commonly opened on phones, so use the mobile preview to check readability on a small screen.
- Take advantage of the sidebar shortcuts. You don't need to return to the dashboard to generate a QR or export a PDF. Everything is accessible from the sidebar.
- Collapse categories that you are not editing. If your menu is extensive, collapse completed categories for a cleaner view.
Common Troubleshooting
I don't see my products on the dashboard
Check that you don't have an active filter hiding products. Tap "Clear filters" on the filter bar. Also, make sure you are in the correct menu if your restaurant has multiple menus.
I can't drag elements on the dashboard
Drag & drop only works in the desktop version. On mobile, use the arrow buttons to reorder. If you are on desktop and it doesn't work, try refreshing the page.
The language selector does not show all my languages
Check that the languages are activated in your business settings. Only active languages appear in the dashboard selector.
The dashboard loads very slowly
If you have hundreds of products, the dashboard may take a few seconds to load. Use filters to show only the section you need to edit. The filters work in the browser and do not make server calls.
I don't see the Gaston button
On desktop, Gaston is in the left sidebar. On mobile, it appears as a floating button in the bottom right corner. If you don't see it, check that your plan includes access to Gaston.
Frequently Asked Questions
Is the dashboard different on mobile and desktop?
Yes. They are two completely different interfaces. Desktop uses a flat accordion with drag & drop. Mobile uses hierarchical navigation by levels with touch buttons.
Can I change the menu language from the dashboard?
Yes. The language selector allows you to view and edit your menu in any of the active languages. It's like putting on glasses of another language to see your menu.
How do I reorder products?
On desktop, drag and drop. On mobile, use the up and down arrows. The change is saved automatically and reflected instantly in the public menu.
Do filters affect what my customers see?
No. Filters are only for your internal management. Your customers always see the complete menu.
Can I manage multiple restaurants from the same dashboard?
Yes. Each business has its own dashboard. You can switch between them from the business selector without logging out.
Related Tutorials
Continue setting up your digital menu with these guides:
- Create Categories to organize the sections of your menu
- Create Subcategories to divide categories into clear sections
- Create Products to add dishes with prices and AI images
- Menu Management to reorder, duplicate, and create multi-menus
- Gaston - Your AI Assistant to automate your menu management with artificial intelligence
Ready to manage your menu from a centralized panel?
Start My 14-Day Professional Trial
No card required. Setup 5 minutes. Support in your language.
More information: