Create Subcategories in Your Digital Menu - Menu Hierarchy
3 minutes
Subcategories allow you to better organize the hierarchy of your restaurant menu. For example, within "Main Dishes," you can create subcategories like Meats, Fish, and Pasta. This improves navigation and helps the customer find what they are looking for more quickly.
In this section, you will learn how to create and manage subcategories in less than 3 minutes. The process is the same on desktop and mobile.
What You Will Learn in This Section
- Where to find the button to create subcategories
- How to fill in the information for a subcategory
- How automatic translation to other languages works
- How subcategories are displayed on the dashboard
- When to use subcategories and when not to
- Tips for organizing a professional menu
Step 1: Accessing Subcategory Creation
To create a subcategory, you first need to have at least one category created. Subcategories always belong to a parent category.
In the desktop dashboard, expand the category where you want to add the subcategory by clicking on it. You will see the "+ Subcategory" button within the expanded category.
- Click on the parent category (for example, "Main Dishes") to expand it
- Look for the "+ Subcategory" button that appears within the accordion
- Click the button to open the creation modal
In the mobile view, navigate to the category where you want to add the subcategory. Tap on the category to see its content, and you will find the button to add a new subcategory.
- Tap on the parent category to navigate to its content
- Look for the "+ Subcategory" button at the top or bottom of the list
- Tap to open the creation form
Tip
If you do not have any categories created yet, you must first create at least one. Check the section Create Categories to learn how to do it.
Step 2: Fill in the Subcategory Information
The creation modal allows you to define the basic details of your subcategory. Only the name is mandatory. The rest of the fields are optional but recommended for a more professional menu.
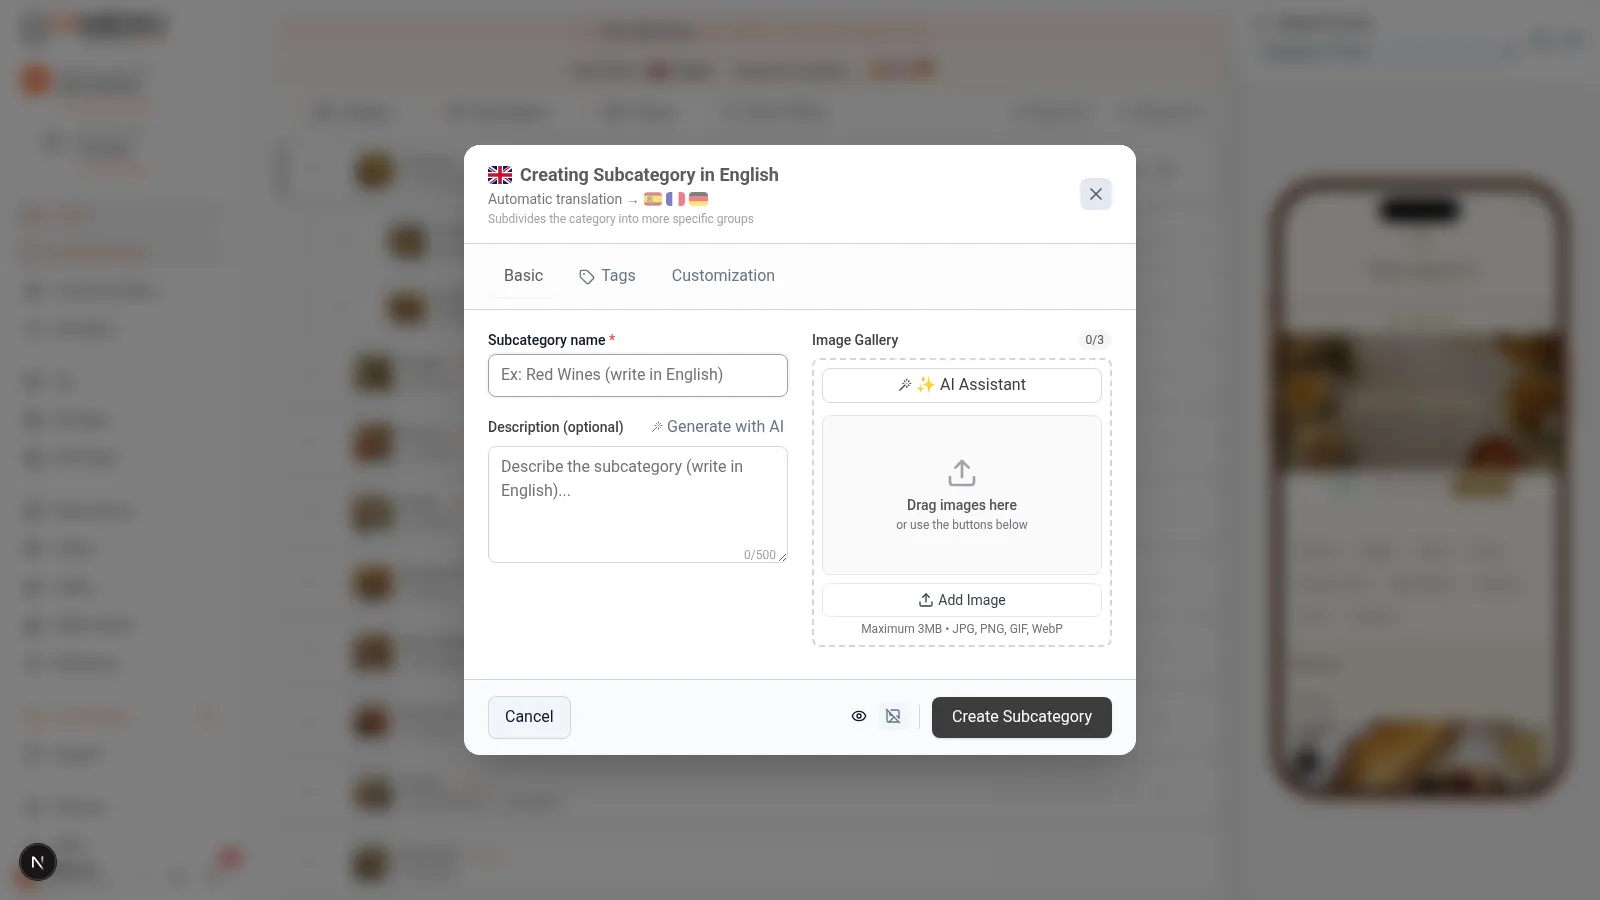
The subcategory creation modal includes:
- Name (mandatory): The name that your customers will see. For example, "Meats," "Fish," "Pasta." Choose short and descriptive names.
- Description (optional): A brief text that describes this section of your menu. Ideal for attracting the customer's attention. For example: "Our selected meats from local ranches, grilled to perfection."
- Image (optional): Upload a representative photo or generate one with AI by clicking the automatic generation button. The image appears in the customer view alongside the name.
Fill in at least the name and click "Save" to create the subcategory.
On mobile, the form adapts to your screen. The fields are the same as on desktop:
- Name: Enter the name of the subcategory. Use clear names like "Meats," "Salads," or "Rice Dishes."
- Description: Add an optional descriptive text that invites the customer to explore this section.
- Image: Upload a photo or generate one with artificial intelligence. The images generated by AI are professional and free with your plan.
Scroll down if necessary to see all the fields and tap "Save."
Step 3: Automatic Translation to Other Languages
If you have multiple languages activated in your digital menu, iaMenu automatically translates the name and description of your subcategory into all active languages. You do not need to do anything extra. The system uses GPT-4o-mini to generate professional translations in seconds.
When you save a subcategory, you will see a banner at the top of the dashboard indicating that the translation is in progress. For example:
- You create "Grilled Meats" in Spanish.
- iaMenu automatically translates it to English ("Grilled Meats"), French ("Viandes Grillées"), German ("Grillgerichte"), and all active languages.
- The translation takes only a few seconds thanks to the integrated AI.
Your international customers will see the subcategory in their language automatically when they access the menu. If you are editing the menu in a different language than the primary one (for example, in English), iaMenu detects that it is not the base language and performs a Smart Swap: it saves the base version in Spanish and your original text as the English translation.
Tip
Translations are generated automatically with GPT-4o-mini. If you need to adjust a translation manually, simply switch to the desired language from the language selector on the dashboard and edit the text. Manual edits are protected, and the AI will not overwrite them.
Step 4: View the Subcategory on the Dashboard
Once created, the subcategory appears nested within its parent category, ready for you to add products.
In the desktop dashboard, the hierarchy of your restaurant menu is displayed as an accordion with visual depth levels:
- Level 0: Categories (for example, "Main Dishes")
- Level 1: Subcategories (for example, "Meats," "Fish")
- Level 2: Products within each subcategory
You can expand and collapse each level to keep your menu organized. Drag the subcategories to change their order within the category. The system uses gaps of 1000 in the order to insert intermediate elements without conflicts.
In the mobile view, navigation is hierarchical by levels:
- First, you see the categories
- You tap on a category and see its subcategories and direct products
- You tap on a subcategory and see the products it contains
Use the up/down arrow buttons to change the order of the subcategories. The change is saved automatically.
Step 5: When to Use Subcategories (and When Not)
Subcategories are optional. Not all menus need them. Here is a quick guide to decide:
Use subcategories when:
- Your category has many products and needs division (for example, "Main Dishes" with 20+ dishes)
- You want to visually separate types of dishes (Meats, Fish, Vegetarian)
- Your customers expect a structured menu (formal restaurants, fine dining)
- You have an extensive menu with more than 50 products in total
You do not need subcategories when:
- Your category has few products (fewer than 8-10)
- Your business is simple (café, food truck with a reduced menu)
- You prefer a flat and direct menu
- You only have 3-4 categories with few dishes each
Importante
Subcategories are optional. You can add products directly to a category without creating subcategories. If your menu is small, a flat structure may be clearer for your customers.
Example of a complete hierarchy:
- Main Dishes (category)
- Meats (subcategory) → Tenderloin, Ribeye, T-bone
- Fish (subcategory) → Sea Bass, Dorada, Cod
- Pasta (subcategory) → Carbonara, Bolognese, Pesto
- Desserts (category)
- Tiramisu, Cheesecake, Catalan Cream (direct products, without subcategories)
Tips and Best Practices
Follow these recommendations to organize your menu professionally:
- Use short and clear names. "Meats" is better than "Our Premium Meat Selections." The customer scans the menu quickly.
- Limit to 3-8 subcategories per category. Too many subcategories hinder navigation.
- Add descriptions to each subcategory. A brief text like "Select cuts from local ranches" generates more interest than just a name.
- Generate images with AI for each subcategory. Subcategories with images stand out more in the customer view.
- Order the subcategories from most popular to least. Place the most requested ones first.
- Think about the mobile customer. 85% of QR scans are from mobile. Use names that read well on a small screen.
- Review the structure before publishing. A good hierarchy reduces the time it takes for the customer to find what they want.
Common Problem Solutions
I don't see the button to create subcategories
You must first expand the parent category by clicking on it. The "+ Subcategory" button only appears when the category is expanded. If you do not have categories, create one first from Create Categories.
The subcategory does not appear in the customer view
Check that the subcategory has at least one active product. Empty subcategories are not shown to customers to avoid sections without content.
I cannot change the order of the subcategories
On desktop, drag and drop the subcategory. On mobile, use the arrow buttons. If the problem persists, refresh the dashboard page.
The automatic translation is not generated
Make sure you have more than one language activated in the business settings. Translations are only generated if there are additional active languages. Also, check that you have not reached the translation limit of your plan.
The image generated with AI does not convince me
You can generate a new image with AI as many times as you want (within the limit of your plan). You can also upload your own photo in JPG or PNG format.
Frequently Asked Questions about Subcategories
Can I create products without using subcategories?
Yes. Subcategories are optional. You can add products directly to a category. If your menu is small, a flat structure may be clearer.
How many subcategories can I create within a category?
There is no limit to the number of subcategories per category. You can create as many as you need. We recommend between 3 and 8 per category to keep the menu clear and easy to navigate.
Are subcategories automatically translated?
Yes. When you create a subcategory, iaMenu automatically translates the name and description into all active languages using GPT-4o-mini in seconds.
Can I change the order of the subcategories later?
Yes. On desktop, drag and drop. On mobile, use the up and down arrow buttons. The change is saved automatically.
What happens if I delete a subcategory with products?
The products from that subcategory move to the parent category as direct products. No products are deleted when a subcategory is removed.
Related Tutorials
Continue setting up your digital menu with these guides:
- Create Categories to organize the main sections of your menu
- Create Products to add dishes with prices, images, and descriptions
- Manage Your Menu to reorder, duplicate, and activate or deactivate items
- Allergens and Labels to set up automatic allergen detection
- Automatic Translations to understand how translation to 29 languages works
Ready to organize your digital menu with subcategories?
Create My Digital Menu - 14 Days Free
No card required. Setup in 5 minutes. Support in Spanish.
More information: