Customize Your Digital Menu: Happy Hour, Availability, and Dynamic Pricing
8 minutes
Learn how to set up dynamic pricing with automatic happy hour, dish availability schedules, multiple prices, and visual separators. In just 8 minutes, you'll have a QR menu that adapts to every moment of the day without you having to touch anything.
What You Will Learn in This Section
- Activate happy hour with automatic special prices
- Set up availability by schedule for each dish
- Use multiple prices (full portion, half portion, tapa, pincho)
- Create visual separators to organize your menu
- See how your customers experience the changes in real time
Step 1: Access the Customization Panel
The customization panel is located within the editing modal of each product. From there, you can control dynamic pricing, schedules, and advanced visual options.
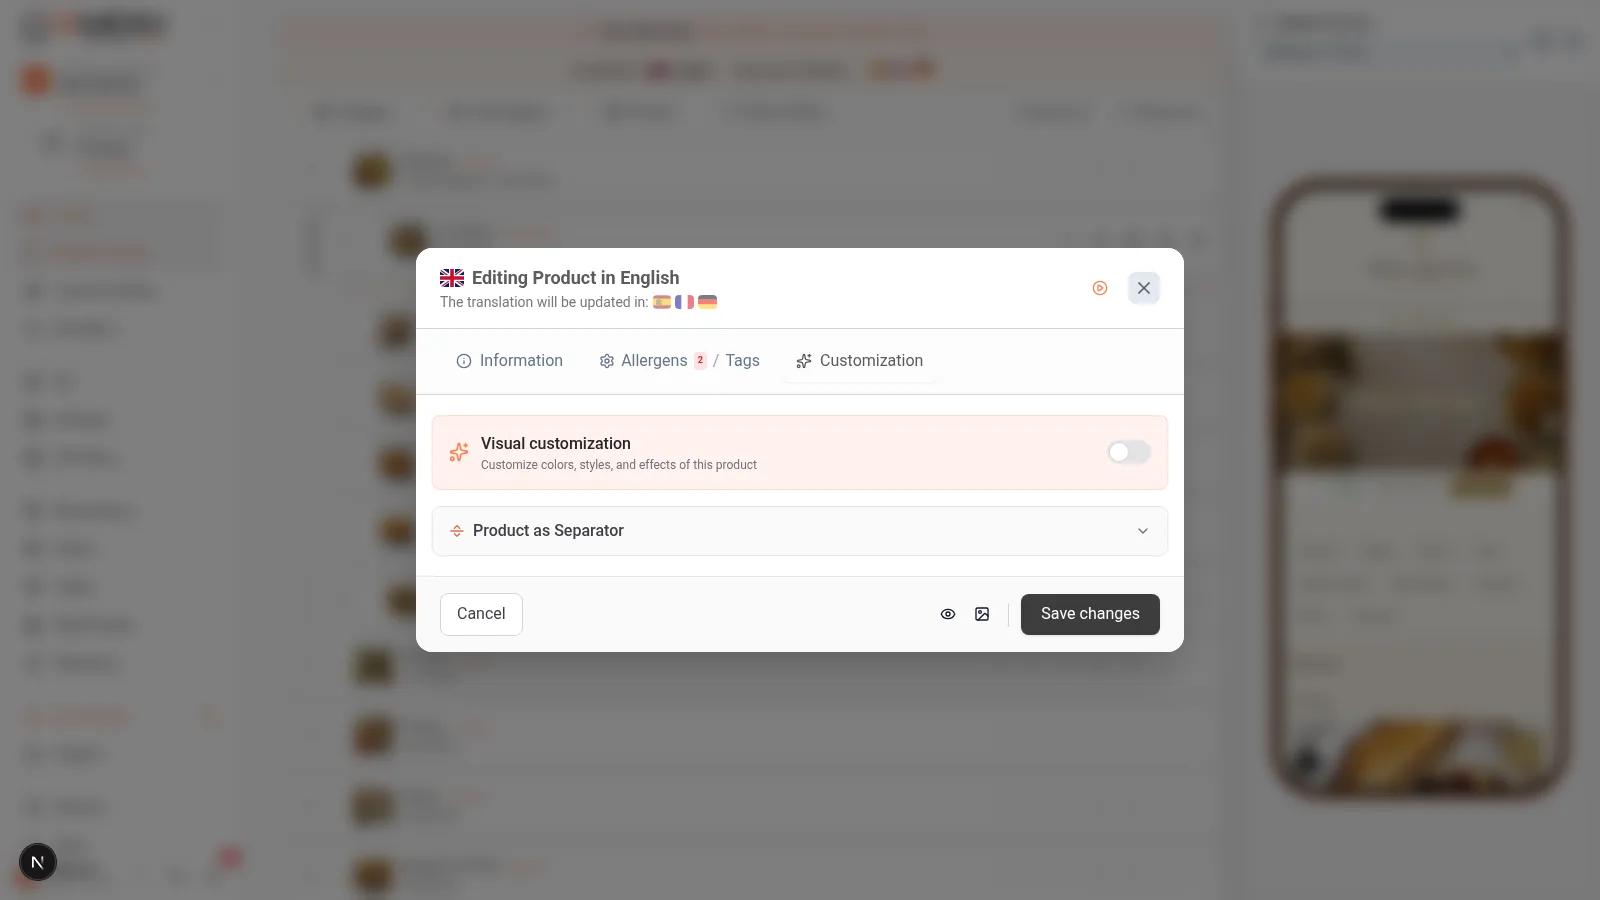
In the desktop dashboard, click on any product to open it. You will see several tabs at the top of the modal. Select the "Customization" tab to access all advanced options.
From this tab, you can configure:
- Happy Hour: Special price at specific times
- Availability: When the dish is displayed
- Separator: Convert the item into a visual divider
In the mobile version, open any product by tapping on it. Scroll down to find the Customization section. The options appear as collapsible sections that you can expand by tapping each one.
Tip
Tip: The Customization tab only appears when editing an existing product. If you just created a product, save it first and then open it again to see all the options.
Step 2: Set Up Happy Hour with Automatic Prices
The happy hour in your digital menu allows you to offer special prices during specific time slots. Your customers see the reduced price automatically when they scan the QR during those hours, without you having to do anything manually.
To activate automatic happy hour in your QR menu:
- Turn on the "Happy Hour" switch
- Define the start time (for example, 17:00)
- Define the end time (for example, 20:00)
- Select the days of the week it applies (Monday to Friday, weekends only, etc.)
- Enter the special price during happy hour
- Click Save
The original price will be shown crossed out next to the happy hour price when a customer accesses the menu during that time slot.
On mobile, the happy hour setup works the same way:
- Tap the "Happy Hour" switch to activate it
- Select the start and end times using the selectors
- Check the days of the week
- Enter the special price
- Tap Save
The time selectors are native to the device, so they adapt to your regional settings.
Pro Tip
Pro Tip: A tapas bar can set happy hour from 17:00 to 19:00 on beers and snacks to attract customers during peak hours. Customers who scan the QR menu during happy hour will automatically see the reduced prices without manual intervention.
Step 3: View Happy Hour from the Customer's Perspective
When your customers scan the QR and access the menu during happy hour, they see the price change clearly and attractively.
In the public view of the menu, the product shows:
- The original price crossed out (for example,
8.00 €) - The happy hour price highlighted (for example, 5.50 €)
- A visual indicator that the offer is active
Outside the configured hours, the product automatically reverts to its normal price. You don't need to remember to activate or deactivate anything.
In the customer's mobile view, the effect is identical: crossed-out price + special price. The display adapts perfectly to any screen, maintaining clarity of the discount.
Importante
Important: Make sure to correctly set the time zone of your restaurant in the business settings. If the time zone is wrong, happy hour prices could activate at incorrect times. You can verify it in Business Settings.
Step 4: Set Up Availability by Schedule
Time-based availability allows you to define when a dish is displayed. It is perfect for restaurants that offer breakfasts, lunches, and dinners with different dishes, or for seasonal products.
To set the availability schedule for a dish:
- Turn on the "Availability by Schedule" switch
- Define the start time when the dish will be visible (for example, 12:00)
- Define the end time (for example, 16:00)
- Select the days it will be available
- Click Save
Outside of that schedule, the dish simply does not appear in the customer's menu. It does not show as "sold out" nor creates confusion: it is simply not visible.
On mobile, the setup is the same. Use the native selectors on your device to choose times and tap the days of the week to activate or deactivate them.
Availability is applied in real time: if a customer scans the QR outside the configured hours, that dish does not appear on their menu.
Ahorra Tiempo
Save Time: If you have a "Menu of the Day" that you only offer from Monday to Friday from 13:00 to 16:00, set the availability once and forget it. The digital menu updates itself every day without your intervention.
Step 5: Set Up Multiple Prices
Many restaurants need more than one price per product: full portion, half portion, tapa, pincho. IAMenu supports up to 4 different prices per product, each with its own customizable label.
To activate multiple prices in your digital menu:
- In the product form, check the "Multiple Prices" checkbox
- Up to 4 price fields with editable labels will appear
- Write the label for each option (Full Portion, Half, Tapa, Pincho, Glass, Bottle...)
- Enter the price for each variant
- Leave empty the fields you do not need
The labels are completely customizable. You can use "Glass" and "Bottle" for wines, "Unit" and "Dozen" for oysters, or whatever your menu needs.
On mobile, the multiple price fields appear below the main price. Tap each field to edit the label and price.
The labels are automatically translated into the active languages of your menu thanks to the IAMenu translation system.
Tip
Tip: The multiple price labels are automatically translated into all active languages of your menu. If you write "Full Portion" in Spanish, your French customers will see "Portion" and your English customers will see "Portion" without you having to do anything else.
Step 6: Create Visual Separators
Separators are visual elements that help organize your digital menu clearly. You can create dividing lines, spaces, or decorative titles between groups of products.
To create a visual separator in your menu:
- Open the "Customization" tab of the product
- Activate the "Use as Separator" option
- Choose the style of separator:
- Line: A subtle horizontal line
- Space: A blank space between sections
- Title: A decorative text (for example, "--- Chef's Specialties ---")
- Icon: A separator with a visual icon
- Click Save
The separator will appear between products on the menu, both in the customer's view and in the exported PDF menu.
Pro Tip
Pro Tip: Use "Title" type separators to create thematic divisions within a subcategory. For example, within "Wines," you can separate "--- Reds ---", "--- Whites ---", and "--- Rosés ---" without needing to create additional subcategories.
Step 7: Advanced Combinations for Your Digital Menu
Customization options can be combined to create unique experiences. Here are some examples of dynamic pricing configurations for different types of establishments:
Tapas Bar
- Multiple Prices: Tapa (3.50 €), Half Portion (6.00 €), Full Portion (9.50 €)
- Happy Hour: Beer from 4.00 € to 2.50 € from 17:00 to 19:00 (M-F)
- Separators: "--- Cold Tapas ---" and "--- Hot Tapas ---"
Restaurant with Menu of the Day
- Availability: "Menu of the Day" visible only from 13:00 to 16:00 (M-F)
- Happy Hour for Dinners: Bottle of wine from 18 € to 12 € on Wednesdays from 20:00 to 22:00
- Separators: "--- Starters ---", "--- Main Courses ---", "--- Desserts ---"
Hotel with Room Service
- Availability: Breakfast (7:00-11:00), Lunch (12:00-16:00), Dinner (19:00-23:00)
- Multiple Prices: "In Room" and "Room Service" with different prices
- Happy Hour: Cocktails in the lobby bar from 18:00 to 20:00
Tip
Tip: You can see more configuration examples by business type in the Use Cases section, where we detail complete configurations for bars, hotels, food trucks, and restaurant chains.
Tips and Best Practices
Follow these recommendations to make the most of your digital menu customization:
- Set the time zone correctly. Before activating happy hour or availability, verify that your time zone is correctly configured in the business settings. An incorrect time zone activates prices at the wrong times.
- Use happy hour to attract customers during slow hours. Set special prices during off-peak hours to generate additional traffic. Tapas bars can offer reduced-price beers from 17:00 to 19:00.
- Combine availability and multi-menu. For restaurants with a daily menu and dinner menu, use time-based availability on individual products and multi-menu for different complete menus.
- Label multiple prices clearly. Use names that the customer understands instantly: "Tapa," "Half," "Full Portion" instead of "Small," "Medium," "Large."
- Use separators to organize long sections. Within a subcategory with many products, title separators help the customer orient themselves without creating additional subcategories.
- Review the customer view after configuring. Check how happy hour prices and availability look from the customer's perspective by scanning your QR.
Troubleshooting Common Issues
Happy hour prices are not activating at the correct time
Check the time zone configured in your business settings. If it is set to UTC instead of your local time zone, the times will be off. Change the time zone and the prices will activate correctly.
The dish with time-based availability does not appear on the menu
Make sure the current time is within the configured range and that the day of the week is checked. Remember that availability completely hides the dish outside the schedule: it does not show as "sold out," it simply does not appear.
Multiple prices are not showing in the customer view
Verify that you have checked the "Multiple Prices" checkbox and that you have filled in at least two price fields with their corresponding labels. Empty fields will not be shown to the customer.
The separator does not appear in the exported PDF
Not all separator styles are compatible with all PDF templates. "Title" and "Line" type separators work in most templates. Try changing the style if it does not display correctly.
I want a product to have happy hour AND time-based availability
You can activate both options at the same time. The product will only appear during the availability hours, and if it coincides with happy hour, it will show the reduced price.
Frequently Asked Questions
How does automatic happy hour work?
You set the schedule, days, and special price. Customers see the reduced price automatically when scanning the QR during those hours. Outside the schedule, the price returns to normal.
Can I hide dishes outside certain hours?
Yes. Time-based availability completely hides the dish outside the configured time slot. Ideal for daily menus or seasonal dishes.
How many prices can I set for a product?
Up to 4 different prices with customizable labels. You can use Full Portion, Half, Tapa, Glass, Bottle, or any name.
What are separators?
They are decorative elements between products. You can choose line, space, title, or icon. They appear in the digital menu and in the PDF.
Are price labels translated?
Yes. The labels are automatically translated into all active languages. A French customer will see "Portion" instead of "Full Portion."
Related Tutorials
Continue configuring your digital menu with these guides:
- Create Products to add dishes with prices, images, and AI descriptions
- Allergens and Labels for the automatic detection of the 14 EU allergens
- Menu Management to reorder, duplicate, and create multi-menus
- Customer View to customize colors, themes, and styles of your digital menu
- Use Cases to see configuration examples by business type
Ready to create a dynamic menu with automatic prices?
Create your account and review the current plans and terms.
More information: