Create Categories: Organize Your Digital Menu by Sections
5 minutes
Categories are the backbone of your digital menu. A good category structure allows your customers to quickly find what they're looking for: Appetizers, Main Courses, Desserts, Drinks, or any section you need. In this guide, you will learn how to create and organize categories in your digital menu.
What You Will Learn in This Section
- How to access category creation from the dashboard
- Fill in the basic information: name, description, and image
- Use the image gallery (up to 3 photos per category)
- How automatic translation works when saving
- Sort categories in your digital menu
Step 1: Access Category Creation
To organize your restaurant menu, the first step is to create the main sections. From the iaMenu dashboard, you have direct access.
In the desktop dashboard, locate the "+ Create" button at the top. When you click it, a menu with three options will appear: Category, Subcategory, and Product. Select "Category" to open the creation modal.
You can also click the floating "+" button in the bottom right corner of the dashboard if you prefer.
In the mobile view, look for the floating "+" button in the bottom right corner of the screen. When you click it, a menu with the creation options will appear. Select "Category".
The mobile interface is optimized for you to manage your digital menu directly from your phone.
Tip
Categories are the top-level sections of your menu. Think of them as the main blocks of your menu: Appetizers, Meats, Fish, Desserts, Drinks, etc.
Step 2: Fill in the Basic Information
When you open the creation modal, you will find fields to define your category. Each field has a specific purpose to structure your menu correctly.
The category creation modal on desktop displays the main fields in a clear and spacious interface:
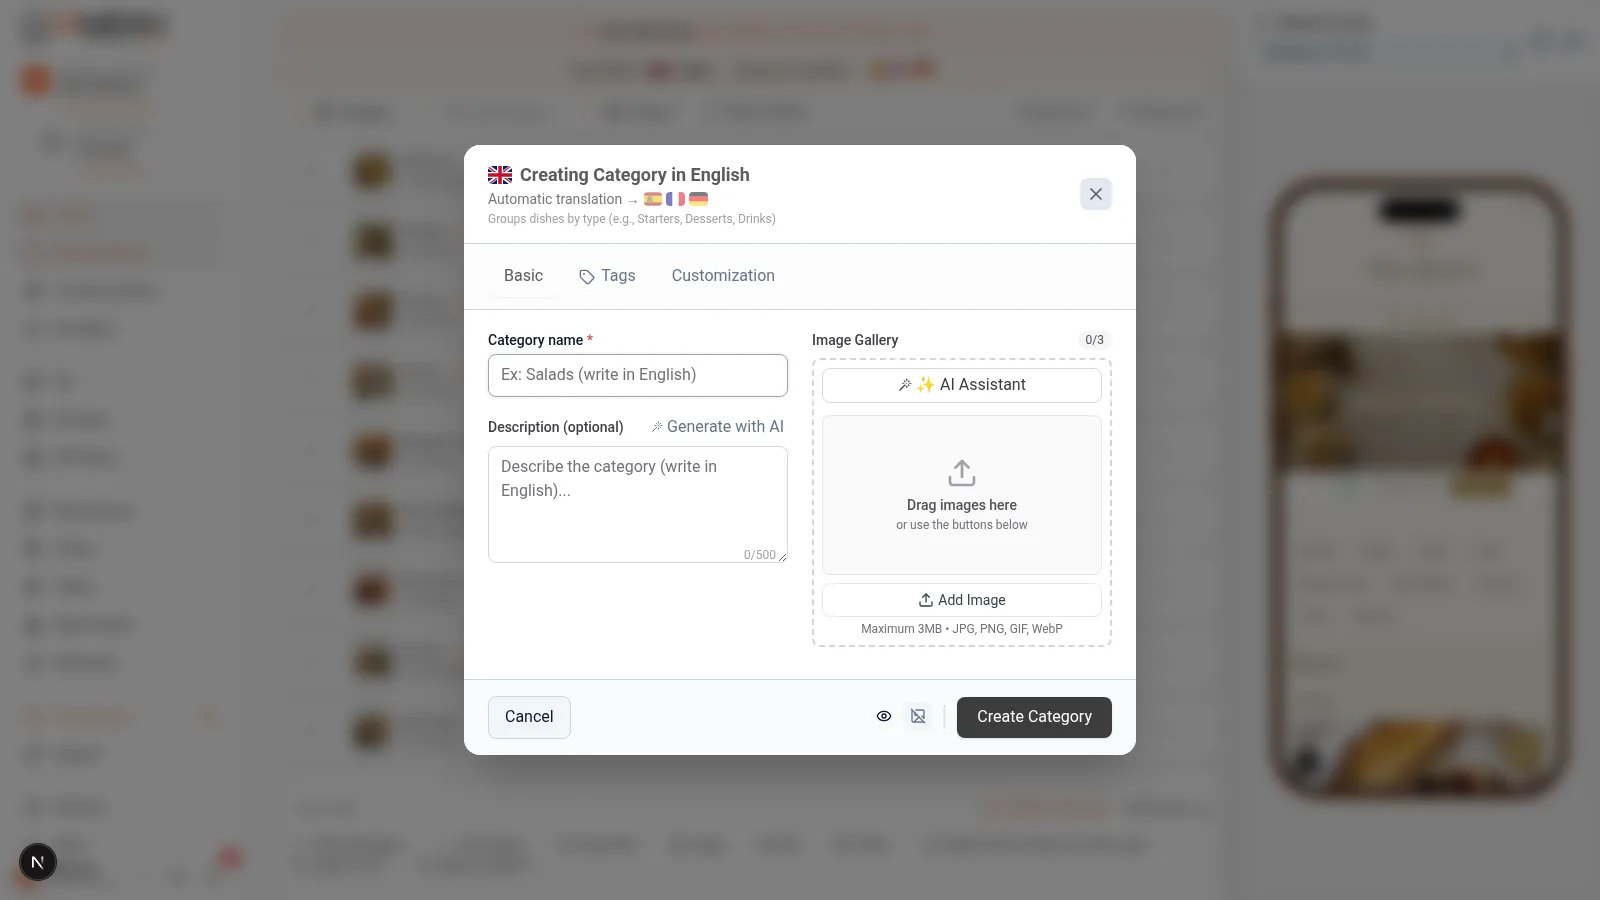
Fill in the following fields:
- Category Name (required): Enter the name as you want it to appear on your digital menu. For example: "Appetizers", "Main Courses", "Homemade Desserts".
- Description (optional): Add a descriptive text that will appear below the category name on the public menu. Ideal for providing context: "Our traditional recipes made with local products".
- Image (optional): Upload a representative photo or generate one with AI.
When you're done, click "Save" to create the category.
On mobile, the modal adapts to full screen for easier editing. Swipe to see all available fields.
The fields are the same as on desktop:
- Name (required): Enter the category name.
- Description (optional): Descriptive text for the public menu.
- Image (optional): Upload or generate with AI.
Click "Save" when you are finished.
Tip
If you write the name in a different language than your restaurant's base language (for example, you write in English but your menu is in Spanish), iaMenu will automatically detect the language and perform a Smart Swap: it will save the version in your base language and create the translation automatically.
Step 3: Add Images to Your Category
Each category can have up to 3 photographs in its gallery. You have two ways to add images: upload from your device or generate with artificial intelligence.
🖥️ On desktop: In the category modal, locate the image section. You have two main options:
- Upload image manually: Click "Upload Image" and select a file (JPG, PNG, WebP). iaMenu automatically optimizes the image in 3 sizes (thumbnail, medium, and large).
- Generate image with AI: Click "Generate with AI" and GPT Image will create a professional photograph based on your category name in less than 10 seconds. If you're not satisfied, you can generate another one.
📱 On mobile: The image section works exactly the same, but you can also take a photo directly with your phone's camera or select one from your gallery.
You can have up to 3 images per category. The first will be the main image visible on the public menu.
Importante
The limits for generating images with AI depend on your plan: Starter (10 images/month), Professional (30/month), and Premium (75/month). Manually uploaded images do not consume AI-generation credits.
Step 4: Automatic Translation When Saving
One of the key advantages of iaMenu for organizing your restaurant menu is the automatic translation. When you save a category, the system automatically translates the name and description into all active languages of your business.
When you click "Save", you will see a notification at the top of the dashboard. The process is automatic and transparent:
- You save the category in your language (e.g., "Appetizers" in Spanish).
- iaMenu automatically translates to the active languages (e.g., "Starters", "Entrées", "Vorspeisen"...).
- The progress bar shows you the status: "Translating Appetizers... EN, FR, DE".
- Review the generated translations before making them visible to customers.
IAMenu supports 29 languages across the platform, including European, Asian, and Arabic languages. Active-language limits are Starter 2, Professional 4, and Premium 8. Generation time varies; review culinary terms before publishing.
Tip
If you need to adjust a specific translation, you can change the active language in the language selector of the dashboard and edit the category. Manually edited translations are marked as "reviewed" and the AI will not overwrite them in future updates.
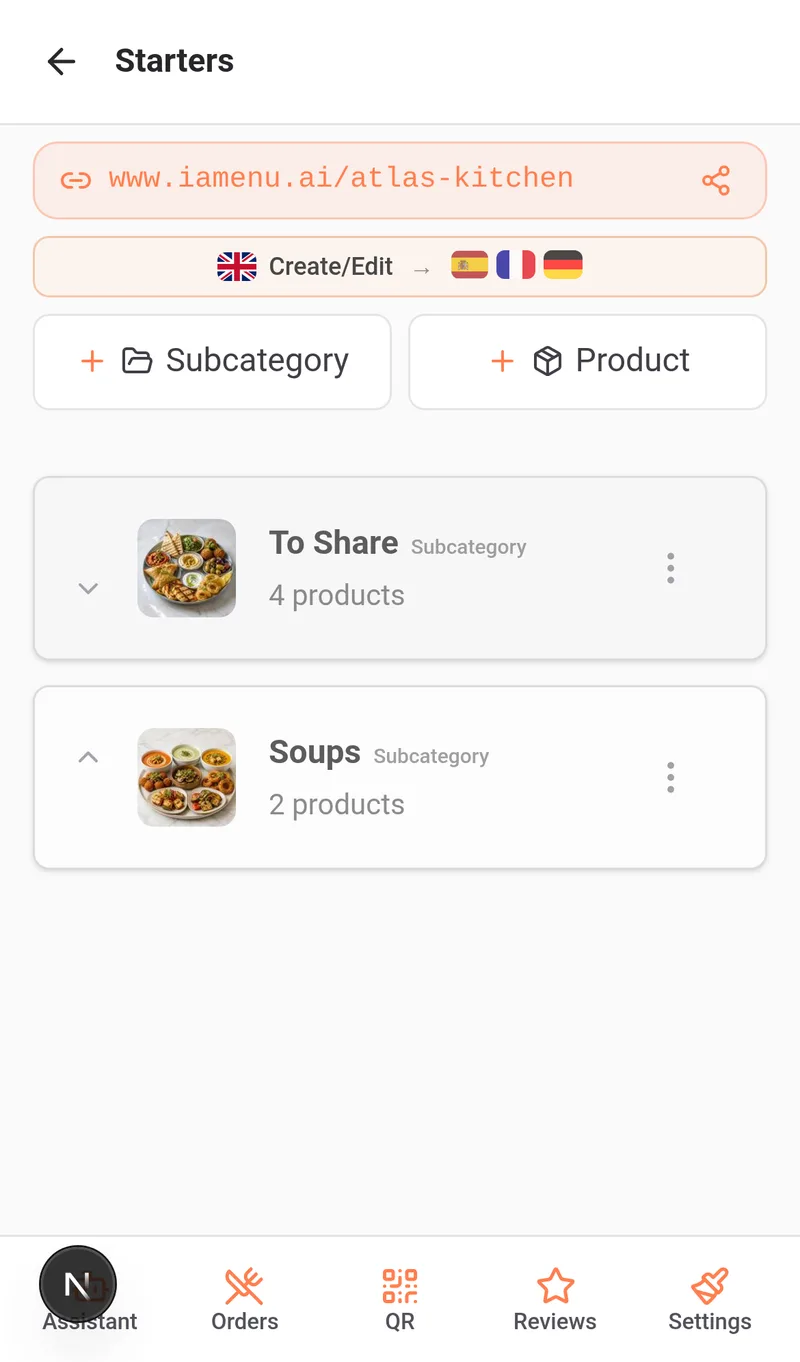
Step 5: View and Sort Categories in the Dashboard
Once created, your category immediately appears in the dashboard ready to add subcategories and products.
On desktop, the category appears as an expandable row in the dashboard accordion. You can:
- Expand/Collapse: Click on the category to see its content
- Reorder with drag & drop: Drag the category to the desired position
- Edit: Click the edit icon to modify the name, description, or image
- Add content: Within the category, you can create subcategories or products directly
The order in which categories appear in the dashboard is exactly the same as what your customers will see on the digital menu.
On mobile, categories appear as cards that you can tap to navigate to their content.
- Navigate: Tap on the category to see its subcategories and products
- Reorder: Use the arrow buttons to move the category up or down
- Edit: Tap the edit icon on the card
- Create inside: Once inside the category, use the "+" button to add subcategories or products
Tip
Place the most popular or profitable categories in the top positions. Studies show that customers pay more attention to the first items on the menu.
Examples of Category Structure
A good organization of your digital menu makes a difference. Here are real examples based on the type of restaurant:
Traditional Restaurant:
- Appetizers
- Soups and Creams
- Meats
- Fish
- Desserts
- Drinks
Pizzeria:
- Classic Pizzas
- Special Pizzas
- Pasta
- Salads
- Drinks
- Desserts
Cafeteria:
- Breakfasts
- Snacks and Sandwiches
- Salads
- Coffees and Infusions
- Juices and Smoothies
- Pastries
Tapas Bar:
- Cold Tapas
- Hot Tapas
- Portions
- Wines
- Beers
- Soft Drinks
Tip
You don't need to create all categories at once. You can add them gradually or use Gaston, the AI assistant, to create the menu structure with a command such as: "Create the categories for an Italian restaurant."
Tips and Best Practices
Follow these recommendations to organize your digital menu professionally:
- Use short and clear names. "Appetizers" is better than "Our selected seasonal appetizers." The customer scans the menu quickly.
- Limit categories to 5-10. Too many categories make navigation difficult. If you need more detail, use subcategories within each category.
- Add a description to each category. A brief text like "Our traditional recipes with local products" generates more interest than just a name.
- Generate images with AI for each category. Categories with images stand out more in the customer's view and enhance the visual experience of your digital menu.
- Order categories from most popular to least. Place the sections that are most requested first: Appetizers, Main Courses, Desserts, Drinks.
- Think about the mobile customer. QR menus are commonly opened on phones, so use names that read well on a small screen.
- Use Gaston to create the structure quickly. A command like "Create the categories for a pizzeria" can reduce repetitive manual entry.
Common Problem Solutions
I don't see the button to create categories
Locate the "+ Create" button at the top of the dashboard. On mobile, look for the floating "+" button in the bottom right corner. If it doesn't appear, check that you have editing permissions (Manager role or higher).
The category does not appear in the customer view
Check that the category has at least one active product. Empty categories are not shown to customers to avoid sections without content.
The image generated with AI doesn't convince me
You can generate a new image as many times as you want within the limit of your plan. You can also upload your own photo in JPG, PNG, or WebP format.
The automatic translation is not generated
Check that you have more than one language activated in the business settings. Translations are only generated if there are additional active languages. Also, verify that you have not reached the translation limit of your plan.
I want to move a category's position
On desktop, drag and drop the category to the desired position. On mobile, use the up and down arrow buttons. The change is saved automatically and reflected instantly in the public menu.
Frequently Asked Questions
How many categories can I create?
There is no limit. You can create as many as you need. We recommend between 5 and 10 to keep navigation clear.
Are categories automatically translated?
Yes. IAMenu can translate the name and description into active languages with GPT-4o-mini. Review the result before publishing.
Can I add images with AI to my categories?
Yes. Each category can have up to 3 images. You can generate professional images with GPT Image directly from the creation modal.
Can I change the order of the categories?
Yes. On desktop, drag and drop. On mobile, use the arrows. The change is saved automatically.
Can I use Gaston to create categories?
Yes. Dictate a command to Gaston like "Create the categories for an Italian restaurant" and review the proposed structure before confirming it.
Related Tutorials
Continue setting up your digital menu with these guides:
- Create Subcategories to divide categories into clear sections like Meats, Fish, or Pastas
- Create Products to add dishes with prices, images, and descriptions
- Menu Management to reorder, duplicate, and create multi-menus
- Allergens and Labels to set up automatic allergen detection
- Gaston - Your AI Assistant to automate the management of your menu with artificial intelligence
Ready to organize your restaurant menu with AI?
Start Free - 14 Days Professional Trial
No credit card required. Setup in 5 minutes. Support in Spanish.
More information: